DIY Playroom Decor: Fairytale Toad “Stools”

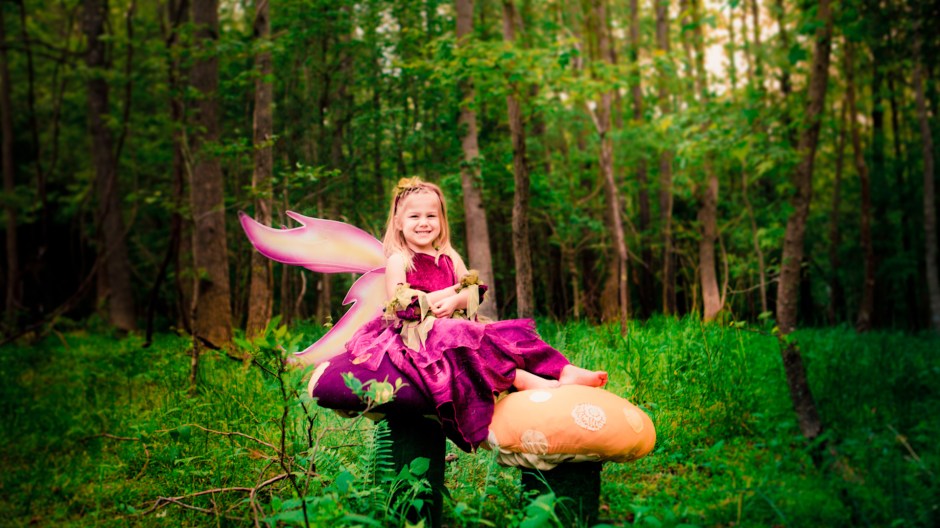
I have been wanting to make these for some time now!  Mushroom and toadstools for a nursery or playroom.  These adorable furniture pieces are perfect for the kids to sit and read their books on.  But as a photographer, they also happen to be the cutest photo prop too or this woodland styled photoshoot!  This shoot has Madeline in the cutest fairy costume from Princess Paradise. I love all things fairy and fairy tale themed.

Here is the complete list of things you will need for these adorable mushrooms:

Supplies:

Don’t forget to subscribe to our Youtube Channel for more regular motherhood fun! Homemaking, DIY, Shake it off with a little laughter and more.


Advertisement

Moving Day!

That day or series of days that most of us dread and when you have kids and the amount of stuff you own pops out like a can of worms it gets even more fun!  Moving Day!  But hey, we made it fun chasing each other around the empty house and having the kids help with the small tasks to gradually undo the coloring on the walls.

In the times we have moved I have learned that there are a series of stages that I go through… they start with Pinterest and perfect organizational expectations and then end with I don’t care, just through that item in a box and we will find it eventually.

Here are my top tips for moving that I have learned over the past ten years:

  1. Do a major purging and fit it to your lifestyle
    1. Take on the whole Japanese technique of asking yourself with each item … does it bring me joy?   No, lol, but really, just go through everything you own and make realistic judgements of whether you will use it or not. With clothing it can be… have I worn this in the last year? And think about your future plans… such as if you plan on having more children and those items should be donated or kept for round 2.  As a photographer I have a TON of stuff.  I am a passionate film maker as well, so in addition to my photography props, film costumes, makeup and equipment, things stack up!  And to add to that there is my crafting supplies, activity supplies etc.  We are very active people who plan a LOT of fun activities so we really do end up using a LOT of stuff.  For example, I like planning parties, hosting playdates and teaching preschool and crafting with the kids… all these activities require objects, supplies etc.  So when I go through my stuff I ask myself what is realistically going to get used… the rest donations.  With costumes we didn’t need anymore for film work or photoshoots, I got rid of.  Also in the purging process, there were a lot of old paints and other kinds of supplies that were trash or projects that I was not longer interested in and knew I would never get around to so it was time to say goodbye.  I also found that it is best when you are in a get rid of that cleaning up kind of mood to be most realistic and helpful in this process.
    2. Make comparisons of how your lifestyle may or may not change and this will also help you decide on what to bring. Also, if you consider your current square footage with your upcoming square footage you can make better judgements about it all.
  2. Do the Math
    1. Budget it all out!  Are you moving yourself or is a company moving you?  How far are you moving and what is it going to cost to transport all that you have.  Is it worth it to simply get rid of items and rebuy them once you get there instead of transporting them?
  3. Get a slightly bigger truck or pod then you think you will need.
    1. Really.  I have heard so many stories of people, friends etc who have had these2 am frustrations of packing the last bit only to realize that it won’t fit and they have to just get rid of it or otherwise repack or arrange a second smaller truck with help etc.  Not fun!  If you aren’t sure and are making the gamble then be sure to prioritize what gets moved into the truck first!  Such as the most sentimental important stuff/ expensive stuff.  Then the items that are on the maybe list won’t be such a heartbreak if they can’t go and can be more easily replaced.
  4. If you are not moving your truck yourself take some sentimental items with you!
    1. I have heard horror stories of trucks getting stolen… items gone.  I was in a bit of a panic attack the first day the movers came trying to get organized and making sure anything sentimental was scanned and backup up online so that if our truck was broken into it would not be a stress!  There were a handful of family history items that I had the hubster fit into the trunk and you know what, it put my mind at so much ease!  I was stressing about something that was pretty much out of my control and just by taking a few sentimental items with me helped so much!
  5. If your items will be going into temporary storage before you move in, ask questions and plan ahead!
    1. Is it temperature controlled?  Will we be able to access it…. etc.
  6. Collect perishables, aerosols and cleaning products and set aside
    1. Use and donate these items before they are moved.  All moving companies do not move these items for liability reasons so it will save you the stress if they are sorted out in advance.  If you are moving yourself be sure to get rid of those items in advance!  I had a whole box of spray paints for crafting etc that I could not bring, so we gave them away.
  7. Take a quick little video of your place!
    1. Madeline helped do ours where she gave us a little tour of our house.  It wasn’t perfectly clean but that is ok.  So many memories take place in our homes and sharing little snippets about favorite memories.. such as “Milo loved to climb in this little cabinet all the time”  are fun details that you will forget!  Family history!  Our took us about 10 minutes to walk through and talk about special memories.
  8. Vacuum Bags!
    1. I recently discovered these on our last move and they are amazing!  I wish I had some video of it so maybe we will post that on a future vlog.  Basically they are the best.  I had a whole bin of scrap fabric planned for specific projects.  Got rid of some but the rest I put in one of these Vacuum Seal Storage Bags and ZZZZRRRrmmmm! Boom!  It skrinks up like magic to be 1/10 the size or smaller depending on the airiness of the item.  Pillows, blankets, sheets, stuffed animals, you name it.  So much space saved!!
  9. Wardrobe boxes
    1. I so love these over other medium to large boxes for all the closet clothing!  Just one of two were enough for us to fit our closets of clothing into.  And we didn’t have to take them all off the hangers.  We simply used rubber bands and then put the bundles in. Easy peasy!
  10. Moving Saran Wrap!
    1. These come in big rolls and they are amazing!  We have used it for medium sized furniture by throwing a blanket over it then wrapping it in this saran wrap so htat is doesn’t get dinged up!

I do have many more tips but these are my top ten.  I hope you find a system that works for you! It certainly helps to be more organized but really I find that not matter what you reorganize everything when you get there anyway so preserve your energies where you can! Good luck and happy moving!

Don’t forget to subscribe to our Youtube Channel for more regular motherhood fun! Homemaking, DIY, Shake it off with a little laughter and more.


First Official VLOG

It is official!  I am mommy vlogging our everyday life.  Not everyday but our everyday if you get me.  And it is an adventure.  When I set out to create Up and Away Moms, I wanted to create a community of mothers sharing their real life… and so for starters I am starting with sharing mine! The messy mom bun, no makeup, no Photoshop side of motherhood. Yes, there are the perfect pictures all over pinterest, but I want to share more of the mess… why?  Because we are all just doing our best!  And in the end, happy healthy kids who feel loved is what matter.  Not so much a spic and span house.  So join us in our little household made a home with these crazy hooligans running around learning and growing each day! Let’s find Joy in the Juggle!

Check out our next vlog of our Moving Day here!

Don’t forget to subscribe to our Youtube Channel for more regular motherhood fun! Homemaking, DIY, Shake it off with a little laughter and more.

Behind the Scenes with our Scrapbooking fun!

I have always been big into scrap booking since I like to save everything but lately Madeline and I have enjoyed sharing this hobby and it is a great way to encourage your toddler to practice writing!

Just like Zumba takes the work our of workout, activities such as this one take the humdrum out of repetitive letter writing and make it a fun activity that not only brings back fun memories but also showcases that adorable developing penmanship alongside the pictures of that same age.

While digital scrap booking may be faster and cheaper, it cannot replace the fun of hands on crafting and mommy daughter bonding time!


Scrapbooking on a budget.

When I mentioned before that I save everything… ok not everything,  but I think twice about throwing things away, but I would consider myself a green conscious crafter.  For example, when I go to tear a tag off of a new bit of clothing, sometimes they are super cute! And I think… this would be cute with a little picture glued on for our scrap booking, so it goes in a box.  Or perhaps the printed backdrop of a castle from Madeline’s barbie box that is cute but technically trash… I think, hmmm this would be cute when we go to scrap book Disneyland and whala! Another cute addition.

The list goes on! It can be a bit of ribbon off a little present or an old newspaper or our own scrapbook background paper with watercolor and a bit of artistic fun.  Pretty much we are always up to make messes and memories together.

If you are new to scrapbooking and looking for a place to start, we love Becky Higgins!  They make it really easy and doable of a craft.  The full pages, like the one you see below, are just some of what we do, otherwise, we will do these insert pages.

crafting with toddlers0

https://www.youtube.com/channel/UCm5H7bPVgGmGAJkZG05YCKg

Don’t forget to subscribe to our Youtube Channel for more regular motherhood fun! Homemaking, DIY, Shake it off with a little laughter and more.


Happy Mother’s Day

Happy Mother’s day out there to all the moms that get what those days are like, you know, the ones covered in spit up and filled with tired tantrums of two year olds.  What you do matters. Even if you don’t see it. Never forget just how important your job is! You are amazing!

https://www.youtube.com/channel/UCm5H7bPVgGmGAJkZG05YCKg

Don’t forget to subscribe to our Youtube Channel for more regular motherhood fun! Homemaking, DIY, Shake it off with a little laughter and more.

A Preview of upcoming videos and more!

Hey moms!  How is your day?  We are so excited to share the wonderful things we have up our sleeves for Up and Away Moms.  Adventures from our travels and many tips coming from me and the mouths of other experienced moms based on the tried and true.

Every mama needs that extra boost.  Sometimes just knowing that you are not the only one with the daily struggles of tantrums and spilled milk and a community to share that is what can help you get through the day. I want to share a positive energy here at Up and Away Moms as genuinely as possible to share mine and other moms stories, laughs and wisdom.

https://www.youtube.com/channel/UCm5H7bPVgGmGAJkZG05YCKg

Don’t forget to subscribe to our Youtube Channel for more regular motherhood fun! Homemaking, DIY, Shake it off with a little laughter and more.

Our Mission!

Hi there!  My name is Rebecca.  Welcome to Up and Away Moms and thanks for stopping by! I am a mother of two, wife of an amazing husband and I am a professional juggler… daily.  As in, I am a mom.  Not a day goes by that at some point I don’t feel like I have joined the circus!

I started Up and Away Moms as a sanity zone for moms, to uplift, inspire and motivate. So join me for a laugh, learning from mine and other moms and their experiences.  Here we have the DIY inspiration, Baking, Planning, Tips and Tricks for managing motherhood, Stories from the heart and a good laugh to share! May what you find here give you that extra little boost, because you CAN do it! Even with spilled milk.

I post twice a week on Youtube!

DIY Nursery Decor

We are celebrating Milo’s 2nd birthday this week!  And for his 2nd year photo shoot, we went with an aviator theme because he is in LOVE with airplanes.  He almost always is holding a little toy in one hand, such as a plan, train, car or dinosaur.  So sweet.  These adorable clouds are very simple to make!  I think they are so fun to hang up in a nursery to add a bit of heaven to the room.

Milo 2 year photoshootA

What you’ll need:

  • white paper lanterns (we used 12″ lanterns from LIHAO, White Round Paper Lanterns)
  • string
  • Stuffing (we used 2x Poly-Fil Stuffing, 20 oz bags)
  • Hot glue gun and hot glue sticks
  • Hooks or other secure and safe system to hang them on the ceiling

To make these cute clouds, simply open the stuffing.  The kids LOVED helping with this part.  We had 2 large bags of stuffing that made about 4-5 large clouds + some for sitting on.  The kids loved jumping in the piles of fluff!

Assemble your paper lanterns

Warm up your hot glue and when ready, glue zig zags in 8 inch areas so you can get the stuffing on before it cools.

Put one hand through the hole of the lantern and the other on the outside to gently clap your hands together to apply the pressure so the stuffing sticks.

Repeat until all the lantern is covered except for the holes.

Tie on your string and hang them at varying heights!

For an additional special effect, add ACPtek LED Part Lights for a unique effect of glowing from the inside. Be sure these lights are secure tied into your lanterns.

Funny side story about these clouds.  I had them hanging in my kitchen after we had done this shoot, and I was babysitting for a friend. Her little 5 year old boy asked me what it was and I said , “a cloud!”  and he asked if it was real.  I held a staight face and told him that I had captured the cloud with a really long rope.  For about 5 minutes he stared at the cloud trying to figure it out and then finally he stands up and puts his hand though the bottom hole of it and says, “It’s not a cloud!  See… I can put my hand through it! You tricked me!”

So funny and sweet, but the best thing was when after that he said,  “you know… if you really wanted to catch a cloud you would need a really really long rope!”

I died!  I love children’s imaginations of how much is possible in their mind.

When my husband was a little boy, about 3, he thought the smoke coming from a factory was a cloud maker.  Sweet young innocence.

Share your results with us! What will you use these cute clouds for?  Props? Nursery decor?  Let us know in the comments below!

Managing the Artwork Clutter

It happens daily, if not multiple times a day, your sweetie brings you their masterpiece.  They might even do that shoulder to the cheek moment and that little look of pride on their face as you graciously accept it, listening to what it was and then you display it for a while.   But it builds up fast!  Here are some tips to managing all that artwork clutter without letting go of the sentimental side.

wall art

Before you get started, determine your own scale.  1. Direct to trash 2. Cute, let’s hang it up for a while… snap and picture and throw it away when no one is looking and 3. Treasure!  I am never throwing it away!

When your child presents their masterpiece to them, likely, more than anything, they want to see that you are proud of their accomplishment and proud enough to display it.  They will likely forget about it soon enough, but the whole process will build a confidence in them and motivate them to do it again… even better.

But all that artwork stacks up FAST! Especially those cotton ball and feather covered paper plates and other 3D creations.

Tips to clear the clutter!

  1. Select a wall and a timetable. Clear, trash or keep and repeat. Snap  a picture of the items as you go, with and/ or without your child.
  2. Write is down.  When you receive your child’s masterpiece, write down what they said it was, their age and name.  Even a week later and it will slip your mind.  What you do decide to keep in the long run will have more meaning if you remember what it was they drew, especially if paired with recent family events such as a fun trip to the beach.
  3. Use them as scrapbook paper. Cut out the image to size and let it be the backdrop to pictures of the kids at those same ages.
  4. Use 12 x 12 and 9 x 12 sized 3 ring Scrapbooks with Clear Sleeves for long term storage. Select a limited number of favorites to keep, take a picture of them, and throw away the undesirables. (We have loved Project Life Three Ring Albums)

Let us know what you like to do to display those masterpieces in the home! Comment below, or share your own child’s masterpieces.


Letting Madeline do My Makeup.

Shake it off with us today with a good laugh!

I think that I have always enjoyed being a little bit of a goof ball for the sake of bringing a smile to someone else’s face.  In part because I am the queen of awkwardness, so I have learned to just roll with it, but I just love to make my kiddos laugh!  So sure, I will let a 3 year old do my makeup.  She is so funny in the video.  She totally got into her little hairdresser / makeup artist mode. So professional!

Madeline and I started talking about this idea and she thought it was the BEST!  We laughed about it for 10 minutes.   And of course the conversation moved in that silly direction of what toddlers think is funny…. ,”and THEN mom I could out GRAPES on your face!!  hahahaahahah”  Silly girl.  She is a riot.

One of my favorite brands of makeup that I have used for years is MAC Makeup.

Don’t forget to subscribe if you haven’t already!  What silly things do you like to do with you kids!  Leave a comment below and let me know.